Settings

Click “System Update” under “Settings” to update your software to the latest version.

Enter your Ultimate Project Manager CRM Pro purchase Key & your Envato (Code Canyon/Themeforest) login details then press “Update now“. Please wait until the process is finished.


Use your Suitable language. You can also edit & add your languages.... Read More

Here All your databases will be stored. Database will be stored here by date, File name and you can take action like: “Download” or “Delete” the database. You can also “Restore Database” & “Backup Database”.


All Email notifications will be shown here. You can control your all emails from this menu.

Menu options be like:-

  • Send Clock Email
  • Leave Email
  • Overtime Email
  • Payslip Email
  • Advance Salary Email
  • Award Email
  • Recruitment Email
  • Announcements Email
  • Training Email
  • Deposit Email


Go to pusher.com. After Sign Up, create app. Follow the details: Name your App – ex “ultimate-pro”, Select a Cluster – By default pusher.com will select your cluster, you can change it if its needed. You can read more here what is cluster: https://pusher.com/docs/clustersWhat’s your frond-end tech? – Select jQuery, What’s your back-end tech? – Select PHP


Click “Menu Allocation” under “Settings” menu to change your Menu Location.

You can easily change your menu allocation. This is a drug and drop system. After changing menu allocation, then click “Submit” Button.


Click “Cronjob” under “Settings” to change your Cronjob Settings.

If cronjobs are not included in your hosting subscription, you can use a free cronjob service like Free Cronjob Service.


Click “Settings” menu then click “Payment Method” to define your payment methods.

You can add your payment method and you can also Edit/Delete payment method.


Click “Settings” menu then click Custom Field” to create your Custom field.

If you need Custom field in your (Deposit, Expense, Tasks, Projects, Leads, Bugs, Tickets, Opportunities, Invoice, Estimates, Proposal, Client, Users, Recruitment, Training, Announcements, Leave management, Item, Supplier, Purchases, Account, Credit Note).

You just select where you need this field and create a field. You can also Enable or Disable this field.


Click Settings” menu then click Opportunities State Reason” to create your Opportunities State.


Click the “Settings” menu

Then click Lead Source” to create your Lead Source. Also, you can edit or delete Leads Source.


Click “Settings” menu then click Leads Status” to create your Leads Status. Also, you can edit or delete Leads Status.


Click the “Settings” menu then click Proposal Settings”.

You can change your Proposal Prefix, Proposal Starting No, Proposal Number Format, Increment Proposal No, Show Item Tax, Write Proposal Terms, and Proposal Footer.


Click “Settings” menu then click Estimate Settings”.

You can change your Estimate Prefix, Estimate Starting No, Estimate Number Format, Increment Estimate No, Show Item Tax and write Estimate Terms, Estimate Footer Text.


Click “Settings” menu then click Allowed IP”.

Add local computer IP. You can Active or Reject IP address access to your application.


Click the Settings” menu 


Then click Customer Group”. You can create your Customer Group”, 


You can also Edit or Delete "Customer Group".


Click “Settings” menu then click “Expense Category”.

You can create your “Expense Category”, and you can also Edit or Delete Expense Category.


Click the “Settings” menu then click ” Income Category”.


 You can create your Income Category”, and you can also Edit or Delete the Income Category.


Click “Settings” menu then click “Leave Category”. You can create your Leave Category”, and you can also Edit or Delete Leave Category.


Click “Settings” menu then click “Working Days”. You can select your Working Days” and Set Time”, you can also Edit Working Days and Time.


Click “Settings” menu then click “Dashboard Settings”.

There are many widgets in the Admin or Client Dashboard.
By default, all widgets are Enabled. Click “Yes/No” Action Button to enable or disable a widget.


Click “Settings” menu then click “Theme Settings”.

You can change:

Sitename: Write the site name.

Logo: Select  (logo / logo & site title).

Active Pre-loader: Active or Deactive Pre-loader.

Active custom color: You can choose the custom color on your website.

Company Logo: Change your company logo.

Login Background: You can change your login background image/video.

Login Position: You can change your login position.

Sidebar Theme: You can change the sidebar theme color.

Layout: You can change menu layout.


Click “Settings” menu then click “Tickets & Leads Settings”.

Setup your Tickets & Leads Settings.


Click “Settings” menu then click Invoice Settings”.

You can change your Invoice Prefix, Invoices due after, Invoice Starting Number, Invoice Number Format, qty calculation from items, Total Item Qty Alert, Amount to Words, Amount to Words into Lowercase,  Allow the client to edit amount, Increment Invoice Number, Show Item Tax, Invoice View, Send Email When Recur, Invoice Logo, Default Terms and Invoice Footer Text.


Click “Settings” menu then click Payment Settings” to change your Payment Settings.

By default, eight payment methods are added. You just click the edit button and add your payment account information. You can also Active or Deactive your payment method.

Click “Settings” menu then click “Email Integration”.

You can set your  Email Integration For Tickets:

Email, Encryption, Host, Username, Password, Mailbox, Only Unread Emails, DELETE EMAIL FROM SERVER AFTER IMPORT


Click the “Settings” menu then click  “Email Templates”.

You can change all Email Templates.

Choose Template Category:

Account Emails

Invoicing Emails

Tasks Email

Bugs Email

Project email

Ticketing Emails

HRM Emails and Extra Emails


You can setup a general email signature in  Settings-> Email Settings, this signature will be using on all email representing your company.

You will need to configure SMTP settings for Ultimate Project Manager CRM PRO if you want to send e.q. invoices, estimates, overdue reminders etc… the SMTP config will act as a general email from Ultimate Project Manager CRM PRO for all emails that will be sent.

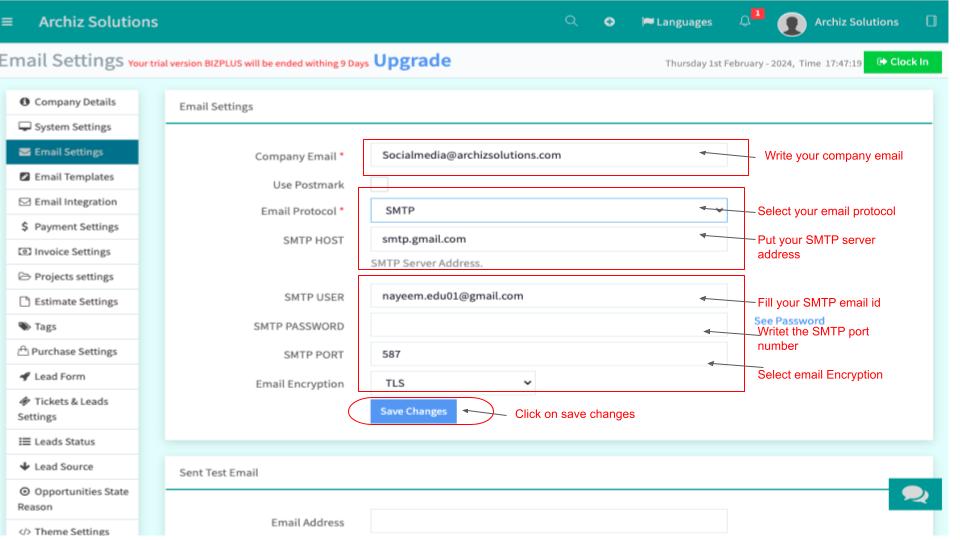
In order to configure the send email feature in Ultimate Project Manager CRM PRO navigate to Settings->Email Settings


Configuration options

Mail Engine

Ultimate Project Manager CRM PRO offers two email engines, by default PHPMailer will be selected. The difference between mail engine is the libraries used to send emails from Ultimate Project Manager CRM PRO.

If you decide to use PHPMailer (which is recommended), the responsible library for this will the popular php email library PHPMailer, you can read more about the library by clicking here

The other mail engine is the default Codeigniter framework library, more info can be found by clicking here

However, you should not worry about this that much, just select the one that you think fits for you.

Email Protocol

SMTP, Sendmail, and Mail.

It’s highly recommended to configure the SMTP protocol for sending emails if you don’t want to encounter issues with emails going to spam or encoding, the examples below will be strictly for the SMTP protocol as it’s the recommended one.

Email Encryption

  • SSL – Select if you are configuring SMTP with port 465
  • TLS – Select if you are configuring SMTP with port 587
  • None – Select if you are configuring SMTP with port 25

Summarized, SSL works with port 465, TLS works with port 587 and if you are trying to configure the SMTP config with port 25 (non-secure) there will be no encryption and you should select None.

SMTP Host

Enter your SMTP hostname.

SMTP Port

Enter your SMTP port

Don’t mix up these modes; Email encryption set to SSL on port 587 or TLS on port 465 will not work.

Email

Enter the SMTP email you are trying to configure as a general email for Ultimate Project Manager CRM PRO, in most cases, this will be a mail only used for sending emails from Ultimate Project Manager CRM PRO, e.q. you can create an email account with name no-reply@ or info@, however, this is up to you to determine how best fit for your needs.

SMTP Username

Fill only if your email client use username for SMTP login, mostly you will fill this field if you are using an exchange mailbox.

In most cases when you are using the exchange server, you will need to log in with username not with the email address, in this case, Ultimate Project Manager CRM PRO will use the SMTP Username field to log in to your mail server instead of the email address, however the Email address you filled above will be still used as a FROM header.

SMTP Password

Fill the password for login, you should already know your password.

Email Charset

The default is UTF-8, you won’t need to change this ever, because in most cases this works fine, however, if you decide to change the encoding it’s highly recommended perform few types of research to see what encoding is best fit for you.

BCC All Emails To

You can add email to be added as BCC header if you want to keep track and get copies of all emails sent from Ultimate Project Manager CRM PRO if you need to add multiple BCC emails, separate them by a comma.

Email Signature

Global email signature for all emails sent, can be used as merge field added in email templates in Settings->Email Templates, keep in mind this option can be overridden if e.q. the staff that is sending an invoice to an email have configured a custom email signature in his profile.

Predefined Header & Predefined Footer

Ultimate Project Manager CRM PRO installation by default comes with a predefined header and predefined footer for all email templates, the predefined header and footer is pretty clean but if you need something more then this, feel free to adjust the code.

The email message contents are merged in between the predefined header and footer e.q.


[predefined header code]

The email message

[predefined footer code]


So for example, if you opened a

in the header and you did not close the
HTML while formatting the header, you MUST close  (
) the HTML tag in the footer.

Click here to learn more about HTML

Email Templates

Click here to read more about the email templates in Ultimate Project Manager CRM PRO

Examples

The below examples are general examples how to configure SMTP to send an email, keep in mind that the examples may be different then your actual server requirements, the best is to consult with your hosting provider to provide you the correct SMTP configuration.

SMTP server over port 25

Encryption: None
SMTP Host: yoursmtphost.com
SMTP Port : 25
SMTP Email: Your email
SMTP Password: Your password

SMTP servers that require SSL connection

Encryption: SSL
SMTP Host: yoursmtphost.com
SMTP Port : 465
SMTP Email: Your email
SMTP Password: Your password

For Gmail use the following configuration:

Encryption: SSL
SMTP Host: smtp.gmail.com
SMTP Port : 465 / For TLS encryption use port 587
SMTP Email: youremail@gmail.com
SMTP Password: Your password

If you are using Gmail / G Suite you need to have enabled less secure apps in your account.

Testing SMTP Setup

If you need to test your SMTP setup just go to Setup -> Settings -> Email and scroll down to Send Test Email to enter your email address and click the submit button. If the SMTP is setup correctly you will receive green notifications saying that your email is set up correctly also an email will be sent to the email address you entered otherwise debug message from the email client will be shown.

After you configure the SMTP settings, you will need to test if the configuration is properly configured and it is working fine.

While you are in Settings->Email Settings and scroll down to Send Test Email to enter your email address and click the submit button. If the SMTP is setup correctly you will receive green notifications saying that your email is set up correctly also an email will be sent to the email address you entered otherwise debug message from the email client will be shown.

Click settings/system Menu. System settings are the most important part.

  • Language (You can change  language)
  • Location
  • Time zone
  • Currency (You add unlimited Currency in your application.)
  • Default Account (You can add an initial balance to your business.)
  • Default Payment Method (You can add your preferred payment method.)
  • Attendance Report
  • Project Details View
  • Task details view
  • Currency Position (You can change the currency position left or right)
  • Default Tax
  • Tables Pagination Limit
  • Date Format
  • Time Format
  • Money Format
  • Allowed Files
  • Max File size (MB)
  • Google API KE
  • Recaptcha site key
  • Recaptcha secret key
  • Auto close ticket
  • Enable Languages
  • Allow Sub Tasks
  • Only Allowed IPs can Clock IN/OUT
  • Allow Client Registration
  • Allow Apply for the job from Login
  • Allow custom permission
  • Client Default Menu
  • Client Can Create a Project


You have to fill in the  Project prefix fields.

You have to fill the project Start No.

Fill in the project number format as suggested.

Click on Save Changes


Write the tag name in the box as given below.

Click on "Add Button" to add the tag to the system.

Tags can be edited by using the "Edit Button"


- Write  your Purchase Prefix

- Set Your Purchase Start Number

- Set Your Purchase  Number Format


_ Write Your Return Stock Profile

- Set your  Return Stock  Number

- Set your Return  Stock Number Format


-You Can add Your Purchase Notes


-Click On The Save Changes To Save The Purchase Settings


Create  Leads:

You can create a New Lead by clicking on “New Leads”.


 2. Fill up all info and click “Save” to Save the New Lead.


Click On Settings Then Click on SMS Settings:


Write your account SID 

Write Auth token

Write phone number

Mark as Active


Write APi Key.

Mark as active


Click on save changes to save the changes you made in SMS Settings


Write the Each Spent Equal


Write the awards points


You can Add a New Award, Edit or Delete an existing Award.

Click on Save Changes after making any changes in the Award Points Settings


Click on New Rule button to add new Rule .


Write the name of the Rule.

Select the Client

Write in the Card.

Write in point from

Write in Point To

Write Description


Click on Save Changes if you want to Save the changes you make.


 Click on New Program

 button to add a New Program.


Write the Program Name 

Select the Award Rule

Select Client

Select Start Date

Select End Date

Write Description

Select Status by default the status will be Active.

Click on Save Changes if you want to Save the changes you make.